If you are on Pinterest I'm sure you have seen this cake.
 Seems like everyday it shows up in someones wedding plan folder.
With the popularity of it I knew it was only a matter of time before I had someone with a photo of this cake in hand.
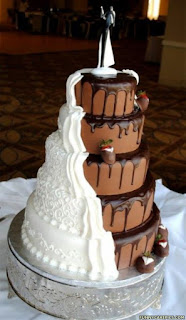
I have done some research and I believe the original design was made by Shockley's Sweet Shoppe in Virginia. I have to admit it is a very impressive, and intimidating cake.
The mother of the bride contacted me inquiring about this cake. I have made a similar cake using buttercream and whipped ganache. That cake was VERY expensive and time consuming to make. This time the cake will be done in fondant as pictured and only 3 tiers instead of 5. I'm hoping with my tall layers I will be able to save much of the look of this 5 tier majestic cake.
I'm going to drag all of you along with me through the making of this cake.
Hopefully it will help any fellow designers and decorators when faced with an order for what I predict will become one of the most requested wedding cake designs next year.
I started off baking layers and layers of white cake. 2 - 10x2 , 2- 8x2 , 2- 6x2. I also made an extra 6 inch layer to use as my ganache drip tester cake. We'll get to that much later.
When I am filling a cake with vanilla buttercream I use my Vanilla Bean Butter Cream recipe for more flavor.
Just make your favorite buttercream recipe, using all butter and no shortening of course...and instead of using 1 tsp I use 1 TBSP of Vanilla Bean Paste. I cannot find it locally so I order online and keep a pretty deep stock in the pantry.
Next I dipped the strawberries. Instead of the Tuxedo berries on the original cake they opted for solid dipped chocolate and white berries , they also requested them stacked on top in lieu of a topper.
To dip the berries first I sorted through a fresh container and picked out just the right sizes for the cake.
Then I melted my chocolate in the microwave on 50% stirring every 20 seconds until it was smooth.
Dip, hold steady and allow the excess chocolate to drip back into the bowl, and place on parchment to harden...mine took approximately 30 minutes.

Next I torted, and filled my cakes with the layer of Vanilla Bean Buttercream .
I tried a new technique for settling my cake, after I had it filled I wrapped the cake in Saran and placed a ceramic tile on top of the cake. It provides firm even pressure and squeezes all the extra air out of the cake in around 3 hrs as opposed to my old method of wrapping and letting set overnight to settle.
Once settled I gave it a nice coat of buttercream, smoothed it, and prepared myself for the fondant.
This cake requires 2 colors of fondant, seamed together for each tier. Satin Ice is still the only fondant I will use and worked great for this cake.
I rolled out some chocolate, peeled up the top of my mat, lightly trimmed a straight edge and placed a ball of white fondant next to it. Rolled it out , paying close attention to the seam, with smooth gentle pressure seal the 2 colors together.

Make sure the darker color is rolled out first so it doesn't show through the lighter fondant when flipped onto the cake.
I then I transferred this to the cake.
Stack the cakes using dowels and plates for support.


I have a Wilton Pattern Press Set that I purchased YEARS ago on clearance and never used until lately, now I use them all the time. They make a beautiful, subtle imprint into the fondant covered cake boards and for the 'piping challenged' ,which I am, it is a great guide for piping buttercream scrolls.
On the white portion of each tier I did my scroll work using pure white buttercream.
Then I piped a 1/2 shell border at the base of the white side.


Once it gave me perfect drips ( around 85 degrees ) I used my squeeze bottle filled with ganache and spread some along the top edges of the chocolate side, very carefully. Better to use too little in each pass than too much. Once I had enough to cover the top edges, I used a butter knife to gently push drips at random intervals to run down the sides of the cake. Start at the top of your cake and work down. These do not have to be perfect, if some runs and pools on the tier below it , that's ok, but try not to let all of the drips run all the way.

I practiced just how much of a 'push' I needed to create small drips on my practice cake. I recommend doing this. This is MUCH easier than I thought it would be.
Once you have your ganache drip , let this dry a bit before attaching your drape.
The final step is the swag, or drape. I roll out a long strip of white fondant mixed with some gumpaste .
The gumpaste will give it a bit of stiffness so the weight of the drape won't pull on the cake too much.
Cut into 4 pieces each being the height of your tiers.
 Fold gently like an accordian but do not apply any pressure, you will be fanning this out once on the cake.


For the last drape, on the top tier, I roll a longer piece of fondant/ gumpaste mix and drape over the top and down the sides and keep it all one piece.
I waited until the cake was set up at the banquet facility to set the strawberries in place , once that is done you can breathe.

This is a gorgeous cake, it uses a few intermediate level techniques and even with all my experience I relied on some experts to guide me through a few steps.
If you are asked to make one , or just want to make one for yourself, make sure you have time, patience, and a practice tier. There are no shortcuts, skimps , or corners that can be cut when making this cake but it's worth every minute you put into it.

With the popularity of it I knew it was only a matter of time before I had someone with a photo of this cake in hand.
I have done some research and I believe the original design was made by Shockley's Sweet Shoppe in Virginia. I have to admit it is a very impressive, and intimidating cake.
The mother of the bride contacted me inquiring about this cake. I have made a similar cake using buttercream and whipped ganache. That cake was VERY expensive and time consuming to make. This time the cake will be done in fondant as pictured and only 3 tiers instead of 5. I'm hoping with my tall layers I will be able to save much of the look of this 5 tier majestic cake.
I'm going to drag all of you along with me through the making of this cake.
Hopefully it will help any fellow designers and decorators when faced with an order for what I predict will become one of the most requested wedding cake designs next year.
I started off baking layers and layers of white cake. 2 - 10x2 , 2- 8x2 , 2- 6x2. I also made an extra 6 inch layer to use as my ganache drip tester cake. We'll get to that much later.
 |
| Save and print jpeg
This cake was ordered with only white cake, and just a layer of vanilla bean buttercream to hold the layers together.
|
Just make your favorite buttercream recipe, using all butter and no shortening of course...and instead of using 1 tsp I use 1 TBSP of Vanilla Bean Paste. I cannot find it locally so I order online and keep a pretty deep stock in the pantry.
Next I dipped the strawberries. Instead of the Tuxedo berries on the original cake they opted for solid dipped chocolate and white berries , they also requested them stacked on top in lieu of a topper.
To dip the berries first I sorted through a fresh container and picked out just the right sizes for the cake.
Then I melted my chocolate in the microwave on 50% stirring every 20 seconds until it was smooth.
Dip, hold steady and allow the excess chocolate to drip back into the bowl, and place on parchment to harden...mine took approximately 30 minutes.

Next I torted, and filled my cakes with the layer of Vanilla Bean Buttercream .
I tried a new technique for settling my cake, after I had it filled I wrapped the cake in Saran and placed a ceramic tile on top of the cake. It provides firm even pressure and squeezes all the extra air out of the cake in around 3 hrs as opposed to my old method of wrapping and letting set overnight to settle.
Once settled I gave it a nice coat of buttercream, smoothed it, and prepared myself for the fondant.
This cake requires 2 colors of fondant, seamed together for each tier. Satin Ice is still the only fondant I will use and worked great for this cake.
I rolled out some chocolate, peeled up the top of my mat, lightly trimmed a straight edge and placed a ball of white fondant next to it. Rolled it out , paying close attention to the seam, with smooth gentle pressure seal the 2 colors together.

Make sure the darker color is rolled out first so it doesn't show through the lighter fondant when flipped onto the cake.
I then I transferred this to the cake.
Stack the cakes using dowels and plates for support.


I have a Wilton Pattern Press Set that I purchased YEARS ago on clearance and never used until lately, now I use them all the time. They make a beautiful, subtle imprint into the fondant covered cake boards and for the 'piping challenged' ,which I am, it is a great guide for piping buttercream scrolls.
On the white portion of each tier I did my scroll work using pure white buttercream.
Then I piped a 1/2 shell border at the base of the white side.

( this pic was taken after the ganache drip, please ignore that for now :)
Now for the chocolate side, this is where my anxiety kicks in. Ganche can be your best friend or your worst enemy. For the dripping technique it has to be just the right temperature to create just the right thickness so that it drips without running and pooling.
This is where my extra tester cake comes into play. I used it to test the temperature and drip effect.
Once it gave me perfect drips ( around 85 degrees ) I used my squeeze bottle filled with ganache and spread some along the top edges of the chocolate side, very carefully. Better to use too little in each pass than too much. Once I had enough to cover the top edges, I used a butter knife to gently push drips at random intervals to run down the sides of the cake. Start at the top of your cake and work down. These do not have to be perfect, if some runs and pools on the tier below it , that's ok, but try not to let all of the drips run all the way.

I practiced just how much of a 'push' I needed to create small drips on my practice cake. I recommend doing this. This is MUCH easier than I thought it would be.
Once you have your ganache drip , let this dry a bit before attaching your drape.
The final step is the swag, or drape. I roll out a long strip of white fondant mixed with some gumpaste .
The gumpaste will give it a bit of stiffness so the weight of the drape won't pull on the cake too much.
Cut into 4 pieces each being the height of your tiers.


Pinch at the top , and damped the underside lightly with some gum glue.
Attach the top to the cake by pressing, and drape down the side.
Repeat for each tier starting at the bottom and working up.

For the last drape, on the top tier, I roll a longer piece of fondant/ gumpaste mix and drape over the top and down the sides and keep it all one piece.
I waited until the cake was set up at the banquet facility to set the strawberries in place , once that is done you can breathe.

This is a gorgeous cake, it uses a few intermediate level techniques and even with all my experience I relied on some experts to guide me through a few steps.
If you are asked to make one , or just want to make one for yourself, make sure you have time, patience, and a practice tier. There are no shortcuts, skimps , or corners that can be cut when making this cake but it's worth every minute you put into it.