Tuesday, February 26, 2013

Test Kitchen Tuesday ~ Week 4

ON TIME! ( after last weeks Wednesday post of Test Kitchen Tuesday.)
Ok, this week I'm going to do something a little different.
I am re-inventing an idea from Pinterest instead of testing out a new recipe.
At Christmas I made the very cute Reindeer Pancakes.


They went over so well I have been making them ever since.

Now that we are rolling into Easter I had to make the Easter Bunny for my son.
It was time for the reindeer to take a break.
Being a cake artist is drama, I'm going to pursue pancake art. Haha!


Here's how I did it.

Start with one standard size pancake.


Next I used a 1/4 measuring cup and poured out some pancake strips.


Add to your bunny face as ears.


Next up are 2 smaller pancakes that I made with a tablespoon of batter in the pan.


Add these as cheeks. ( of course somehow I missed taking a pic of this step )

Then I used a couple slices of bananas and a couple raisins, which I picked through the bag to find similar shapes and sizes thanks to my OCD, for eyes.


A cut piece of banana for teeth.


Add strawberry for a nose.


Make different faces, bend an ear, roll some eyes,  give your bunny some character.


And it's Peter Cottontail at your breakfast table.
Enjoy!

Please don't forget to subscribe to my blog for weekly recipes and reviews along with cake & cupcake decorating tutorials.

Wednesday, February 20, 2013

Test Kitchen Tuesday - Week 3

Well folks, it was bound to happen.
Test kitchen Tuesday doesn't appear until Wednesday.
Anyone who knows me knows that I am rarely on time for anything. This is proving to be no different.

Yesterday while I was supposed to be testing out a great new recipe, I was weeding through bureaucratic red tape.
I was bounced around from the Dept. of Agriculture, to the FDA , to the Health Department.
For each person I spoke with, I have a different answer to the same question.
The FDA says I'm not doing anything wrong, Department of Agriculture says I am.
Well, one person at the department of agriculture says I am, the second one I spoke to had no idea why the first one thinks I am doing anything wrong.
The FDA says , in short, screw the Department of Agriculture, they are wrong.

..and here I am, caught in the middle , just trying to sell some cupcakes and cupcake toppers.
Good thing I had an entire pan of Oatmeal Raisin Bars to keep me sane through this process.

This recipe comes from Martha Stewart. It appealed to me because sometimes, scooping out cookie dough, 1 little cookie at a time is just too much work. Also too much temptation to eat raw cookie dough, which we all know is a no-no ;)
I just LOVE making anything in bar form.

I don't have any photos this week because I made them while on hold with all these wonderful " departments" ( I had a LOT of time to whip these up).
They are VERY easy.

Save and print jpeg

These are wonderful!
Easy, fast , and just YUM!
Our family gives them 6 out of 5 stars,which means...

Survey says :

Tuesday, February 19, 2013

DENIED!

After 13 years of baking for family and friends I decided it was time to take my goods on the road.
Last year I spoke to an inspector in my area who gave me all of the info on the Home Processor Exemption ( known in other states as Cottage Food Law ).
We went over what I could and could not market under the exemption and how it to be done.
Custom cakes were OK according to him but I could not retail them. A farm market would have to be the point of sale.
I wasn't sure I wanted to do that.
We laughed about a client trying to transport a 5 tier wedding cake themselves and what Elmo would look like after an hour car ride in someones trunk in July.
Fortunately we have a wonderful market here in Syracuse, and according to the rules , I would be able to sell my baked goods there should I choose to.

At this time, last year,  I wasn't sure if I could handle the volume of cakes that I could potentially have on order so I inquired about selling just fondant decorating kits and cupcake toppers for people to use to decorate their own cakes.
I was informed that was fine because I was using commercially prepared fondant and gum paste.
Seeing as it was not prepared in my home and not considered "hazardous", I would not be required to have the exemption to produce and sell figurines and cupcake toppers.
I just had to confirm my packaging met the FDA's requirements.
I decided to pursue that avenue as I knew I would not be able to meet the demands of custom cakes and I was NOT comfortable with customers transporting their own cakes.
I needed time to come up with a plan...

Flash forward to last week.

I did some brainstorming and decided I would offer cupcakes, pre packaged holiday cakes and pre packaged ,pre-decorated mini cakes.
Similar to this by The Curly Baker, only with floral and also funky designs.


Once approved,  I would make a few dozen cupcakes and about 4-6 mini cakes, haul them to the market on Saturday mornings and see how they go over with the public.

I called the Department of Agriculture to have them send the inspector out again as I am finally ready to move forward.
I was informed the inspector no longer inspects home kitchens, that all of this is done via email now. ( disturbing to me that  home kitchens are no longer inspected )
I followed the instructions and mailed off my application.
Next stop was my insurance agent, I purchased a liability policy and added the market as an insured as I was instructed.

I consider the mini cakes to be custom cakes, as I plan on decorating them a bit more than just a piped buttercream border and a rose on top.
Reading over the Home Processor info page I see they do not allow the sale of " custom made to order" cakes.  ( mind you I was told last year by an inspector that they ARE permitted but only through the market~ confused yet? yeah, me too :)
I called the office this morning to explain my terminology and spoke to a very helpful woman that understood exactly what I was going to produce and that they would be ok.
My mini cakes would not be made to order, and cupcakes are my primary focus so  I was within the limitations of the Home Processor Exemption.

I was excited to branch out beyond friends and family and possibly to finally make a few dollars for  all of my effort.

...and I was DENIED!

For anyone planning on applying for a NYS Home Processor Exemption I believe it's a great opportunity for home bakers to make some money, just difficult to navigate.

I spoke with 2 people locally, and 2 people in Albany and received 4 different answers on what is allowed and not allowed.
I was informed this morning that I was denied because it is assumed that I am retailing custom cakes.
They supposedly learned this from my blog.

This is my hobby, my time sapping, money sucking hobby that I wish my tax guy could write off for me :) If ever there was a legal eagle, it's me.
Funny thing is some of the cakes that I was accused of selling, are in fact styrofoam dummies that I used to make the tutorials :/
I am assumed to be a cake criminal :

For donating cakes to fundraisers and charitable causes.
For making employees birthdays fun at the office.
For giving cakes as gifts to help cut down wedding costs for friends and family.
For all the creative treats I bring in to the guys at the office.
For donating a cake to a funeral...yup...I couldn't make this stuff up if I tried :)

The system is flawed and I don't feel there is much that can be done to fix it.
I'm going to keep on caking ...

I wonder how much money they assume I have made? Hopefully it's enough to pay for all the cake tools I can't seem to stop ordering.


Sunday, February 17, 2013

Woodland Tree Stump Cake

I never understood why my mother never wanted us to make a big deal of her birthday.  That is until I turned 30...and it only gets worse from there.
I get it now.
This year my Mom turns 60, and of course any sort of party is forbidden. 
But there are no rules when it comes to cake, so on this one I get to have some fun. Well, there is one rule , I am not allowed to put "60" anywhere on it.
German chocolate cake of course, same as every year.

Save and print jpeg
Save and print jpeg
My mother has always been an 'outdoor' person. Loves nature, critters, birds, pretty much anything that sends me running for cover. 
The mall parking lot is as outdoorsy as I get .
The tree stump cake is very popular and I think it will be perfect for her.

I would love to take credit for the design, but I used a tutorial for the cake itself done by Tea Party Cakes.
Fabulous tutorial !
This cake was quite easy to make.


I made some of my own woodland critters a few days in advance, and some gumpaste / fondant ferns with a Wilton Silicone Mold.

The fungus on the tree is made from gumpate and brown fondant that I twisted together to mix. Stop short of completely mixing so you still have some natural looking swirls.
Once they dried I attached them with some melted chocolate.

Any questions , please feel free to ask.
Such a fun cake!
Happy Birthday Mom!


Tuesday, February 12, 2013

Test Kitchen Tuesday ~ Week 2

I had a busy weekend filled with a 3D Nemo cake and a Cupcake tower and cake fit for a princess.
All this leaves me with a lot of cake scraps, and what better to do with cake scraps ??!
Cake Pops!
I need to come up with something fun to take to work so...
This week I will be testing a recipe  that I tweeked from Just a Pinch

Save and print jpeg


You can roll your cake pops into balls or use  one of these cool cake pop makers . (I found mine on ebay ).


Place on wax paper covered cookie sheet. (Should make 20-24)
Place them in the freezer for a little while to firm up (at least a few hours).

Before you take the cake pops out of the freezer, melt chocolate (you will need 2 packages for this many cake pops) in the microwave per directions on package. (30 sec intervals, stirring in between). I used red Wilton candy melts.


If you have been following my blog you already know how these next steps go...


Once you are ready to begin,remove cake pops from freezer. Dip the tip of your lollipop stick in a little of the melted candy coating and insert into the cake balls. (Insert about half way.)


Once firm, carefully insert the cake ball into the candy coating by holding the lollipop stick at a 90 degree angle. rock cake pop from side to side until covered. Do not swirl. 

Coat them twice and make sure to make a complete seal around the entire cake pop. Especially the base when the stick was inserted. 

When the chocolate is almost set, sprinkle the top half of the cake pop with your decorative sprinkles.


Survey Says:


My tips and tweeks:

I used all scratch ingredients, no boxes or cans.
The recipe as I have it written includes my tweeks.
I have finally figured out the consistency for the candy melt coating. I mixed some vegetable shortening with the melts and microwaved, the mixture should be very runny.

Saturday, February 9, 2013

Princess Tiara Tutorial

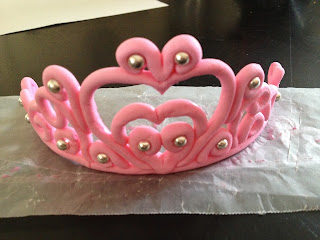
Today I am sharing how I make an edible gumpaste Princess Tiara to use as a cake topper.

You will need the following:


A clay extruder with the large round disc.
A tiara template ( I found one online and printed it out )
Wax paper
Tape
A ball of 80% gum paste and 20% fondant

Lay a piece of wax paper over your template and tape to your table.


Start piping your fondant /gum paste mix.
I lay my bottom line first.


Then I pipe the swirls.

Once you have your template covered, joint the seams by brushing with some water.


Working quickly, this stuff dries out FAST lay your tiara over a cylinder to shape it as it dries. I used a shortening container this time, I have used oatmeal canisters, fondant pails, anything I can find usually.


 Let this dry a day or 2, then very gently peel back the wax paper and let the backside of the tiara dry for a day.

Once that has dried , add your bling. I used Silver Dragees, you can use any sugar gem you can find.

and here it is.


I know, some of you are thinking , " that doesn't look like the one in the tutorial, what's going on?"
You are correct! This is not the one I made in the tutorial.
This one is


This is what happens when your 3 year old decides he wants to be a princess.

You end up having to make another and hoping it dries in time to deliver your cake...fortunately it did!


Tuesday, February 5, 2013

Test Kitchen Tuesday ~ Week 1


Hello!
 My name is Melanie and I am a Pinterest addict.
I pin and pin and pin.
 I stay up until 3 am because I just can't stop scrolling down. I see ' fetching pins ' and that little ball bouncing and my anticipation builds . I can't close out the screen, the next set may have THE recipe I have been searching for all my life and I've already made it 30 pages, I can't risk missing it. There is no turning back...

I have the best intentions of making each and every recipe. I have even gone so far as to buy ingredients for many of these recipes, that end up sitting in my pantry as I procrastinate.
Tuesday, my day off, perfect for clearing out my 'recipes to try' board. 
It's too early in the week for me to begin baking for my weekend cake orders so Test Kitchen Tuesday is born.
Each week I will try a new recipe from my ' Recipes to Try ' board and share the recipe and the results. 
Everything from cookies, to cheesecake.
I'll be sharing these creations with co workers, family, friends, and even customers for their feedback as I am a poor judge... I love everything !

Don't worry if you follow me for decorating tutorials, I will still be doing those as well.

Kicking off Test Kitchen Tuesday is a recipe from a blog: Let's get Cooking


Lemon Berry Mascarpone Cake

3 cups flour
1 and 2/3 cup sugar
Zest and juice of two lemons
6 tbsp of melted butter, plus one stick of butter at room temperature
1 tsp baking powder
1 tsp baking soda
3 eggs
3/4 cup sour cream
2 cups mixed berries (raspberries, blackberries, blueberries…)
12 oz mascarpone cheese
1/4 cup half & half
8 tbsp powdered sugar, plus more for topping


Start by making the crumb topping. Combine one cup of the flour, 2/3 cup of the sugar, and half the lemon zest and juice, and the 6 tbsp of melted butter. Stir with a fork until crumbly.


Set that aside and start the cake. Preheat your oven to 350 degrees.  Grease the sides of two 8″ cake pans then line the bottoms with a round of parchment paper

In a small bowl, sift together the remaining 2 cups flour, 1 tsp baking powder and 1 tsp baking soda.

In mixer bowl, cream the 1 stick of softened butter and the remainder of the lemon zest and juice.  Add the remaining 1 cup sugar and mix well.  Add 3 eggs, one at a time, beating after each addition.  Mix in the dry ingredients and the sour cream, and beat until well combined.


Divide batter between prepared cake pans. Sprinkle one cup of berries over the top of each cake pan.

 Divide the crumb topping mixture evenly between the two pans and press down gently.


Bake for 35 - 45 minutes, or until cake tester inserted in the middle comes out clean.  Let cake cool completely in pans.

When you’re ready to assemble, prepare your filling. Beat together the mascarpone cheese, half & half, and powdered sugar.


Place one cake layer on your serving plate, crumb side up, and spread all the filling on top. 


Top with second cake layer, crumb side up, and dust with powdered sugar.


Refrigerate the cake until the filling is firm, a few hours at least.  Serve cold or at room temperature. Store leftovers in the refrigerator.


Survey says :


I enjoyed it because it was sweet, but not too sweet. I would say this is more of a coffee cake than an after dinner cake due to it's light flavor and texture.

My 3 year old loved it because of the berries.

My other 1/2, Brandon Sr. , liked it , has had 2 slices, but isn't crazy about it. He doesn't care for the filling. I think some additional confectioners sugar would change that.


Tweaks and Tips:

Next time I would add a bit more lemon , I did only have 1 very large lemon on hand , that would have been the equivalent of 2 small lemons. But the lemon flavor isn't as noticeable as I would like it to be.
I would also add about a tablespoon or 2  more confectioners sugar to the filling to sweeten it up a bit. All a matter of preference though. It is delicious as it is.


Saturday, February 2, 2013

How I Do Vegan

Years ago , when I started decorating cakes, I had not one single request for a vegan cake. There seemed to be no special dietary needs, a cake was a cake and you ate it or you didn't.

Now, a large number of my cakes are vegan. As are a large number of friends and family members. Having followed a vegan diet in the past , I have been able to develop some very tasty recipes.
It's one thing to make a vegan cake, it's another to make one durable enough to hold up under fondant and stack. Not to mention whipping up buttercream  to the right consistency for decorating.

I decided to make this a recipe post, to share my tried and true vegan cake and icing recipes.

Most of my vegan requests are for weddings so I will focus on that . 

Save and print jpeg

I use this recipe for my White Wedding Cupcakes also.
The key is to mix one batch at a time , mix by hand but don't over mix.

Save and print jpeg
Save and print jpeg

Fortunately the fondant I use :


It is gluten free, dairy free, nut free , and vegan. This saves me from having to hunt down vegan marshmallows which are amazingly difficult to find in my area.

I hope this helps if you have been tasked with a Vegan Wedding cake ( or any vegan cake ). It is durable, and holds up well under fondant.

Please be advised,there are strict Vegans who do not eat sugar, please verify this restriction with them before baking... just in case.


Enjoy!