It's inevitable, as a cake artist the day will come when you are asked to do a Princess Castle Cake ( if it hasn't come 100 times already ) . I have to admit, I do not like the look of the Wilton Castle cakes so I refuse to go out and buy the kit. I also don't want to have to chase down the pieces following the birthday party. Weddings, I'll hunt down my "props" , but a small , relatively inexpensive birthday cake just isn't worth the inconvenience for all parties involved. So my mission is to make a 100% edible castle cake, fit for a princess. This princess was born on Valentine's Day and her mother wanted me to incorporate that into the cake.
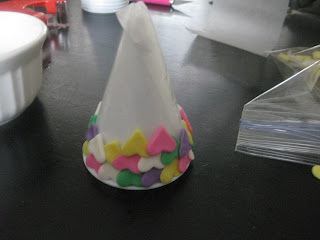
A week in advance I made the turrets, I used the Ateco micro heart cutter and made a zillion ( literally ) hearts out of pink, purple, yellow, blue, and white.


Then I wrapped the Wilton Calla Lily former with some wax paper and gum glued the hearts around it to look like shingles.


I made others by wrapping the Calla Lilly former with white gum paste/fondant using some gum glue to attach the hearts in 3 layers around the bottom.
For the tower I used the cardboard insert from a roll of wrapping paper, cut to the heights I wanted the turrets to be, and covered with wax paper.


I rolled out a mix of pink fondant and gum paste to 1/16th thick, imprinted it with my cobblestone impression mat to get the detail. Then I rolled the fondant around my insert, gum glued the seam and let dry.
Once it is dry and slip it off the cardboard and attach the tops to the turrets with gum glue.
For the castle walls I rolled out more of the pink gum paste / fondant mix, used my cobblestone impression mat again for texture and a template I printed from this website and cut out. For this cake I made 12, 10 , and 8 inch square layers so I had to make 4 ~12 inch long walls, 4 ~10 inch long walls and 4 ~8 inch walls. My iced and stacked layers would be 4.5 inches tall so I made my fondant walls 5 inches tall.

 In the peaks of the castle wall I used my Ateco micro cutters to cut hearts.
Let the walls dry completely before placing them on the cake.
While these were drying I made my cakes and iced them in pink buttercream.
When it was time to attach the walls I just roughed up the buttercream a little and stuck the fondant wall panels to the sides of the cake.
Set the turrets in place and attach with a bit of gum glue.
 Decorate with Ivy and flowers and apply "front doors". I also cut out some heart shaped windows and sprinkled them with blue sprinkles, made a Happy Birthday banner and used my Funky Tappits for her name. I also added some flags at the last minute.

Fit for a Princess...
A week in advance I made the turrets, I used the Ateco micro heart cutter and made a zillion ( literally ) hearts out of pink, purple, yellow, blue, and white.


Then I wrapped the Wilton Calla Lily former with some wax paper and gum glued the hearts around it to look like shingles.


I made others by wrapping the Calla Lilly former with white gum paste/fondant using some gum glue to attach the hearts in 3 layers around the bottom.

For the tower I used the cardboard insert from a roll of wrapping paper, cut to the heights I wanted the turrets to be, and covered with wax paper.


I rolled out a mix of pink fondant and gum paste to 1/16th thick, imprinted it with my cobblestone impression mat to get the detail. Then I rolled the fondant around my insert, gum glued the seam and let dry.
Once it is dry and slip it off the cardboard and attach the tops to the turrets with gum glue.
For the castle walls I rolled out more of the pink gum paste / fondant mix, used my cobblestone impression mat again for texture and a template I printed from this website and cut out. For this cake I made 12, 10 , and 8 inch square layers so I had to make 4 ~12 inch long walls, 4 ~10 inch long walls and 4 ~8 inch walls. My iced and stacked layers would be 4.5 inches tall so I made my fondant walls 5 inches tall.


Let the walls dry completely before placing them on the cake.
While these were drying I made my cakes and iced them in pink buttercream.
When it was time to attach the walls I just roughed up the buttercream a little and stuck the fondant wall panels to the sides of the cake.
Set the turrets in place and attach with a bit of gum glue.


Fit for a Princess...
Thanks for sharing this - it's inspired me to give these ideas a go for my daughters 4th B'day.
ReplyDeleteKaren