Cakes are great, but cupcakes are soooo much easier for a children's birthday party.
The grab and go cupcake doesn't break their stride and saves the adults from cutting and serving cake ( and cleaning up the mess).
This weekend the party was for my friends twins.
I get such a kick out of them.
They were very vocal in their concerns that they would each have their own cupcakes. Her son picked Batman and her daughter picked Dora the Explorer.
Batman is an easy one. I have a set of bat cookie cutters that I use to cut out black bats and I put them on yellow ovals. Couldn't be easier.

Dora, that's a whole different adventure.
I had never made Dora before, but she looked like she was going to be a little easier than others I have done.
When I don't have a cutter I make a template from an image online.
I found a Dora face image and sized it to fit on the cupcake.
I printed it out on computer paper and cut the face out around the outer lines.

Roll out some brown fondant and gumpaste mix to 1/4 inch thickness. Lay a piece of waxed paper over the top, place your cut out image on top of the wax paper and cut around the template with an Exacto knife.
Roll out some beige fondant/ gumpaste mix , cut a circle with a 2 inch round cutter.

Lay the beige circle on the brown cut out piece.

Cut the template along Dora's hairline.

Roll out more of the brown and cover with wax paper, place hair template on the top and cut out with an Exacto knife.

Layer the top hair piece over the beige face circle.
Roll out white fondant and with 1/2 inch round cutter cut 2 circles per topper.
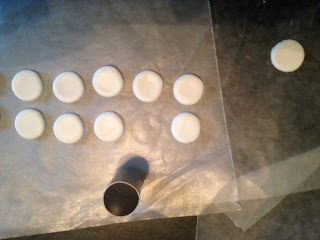
Trim one edge of the circles flat.

Add to Dora's face for her eyes.

Next roll out some more brown. With a round icing tip cut out 2 circles per topper.
center on whites of eyes.


Roll out some black fondant, with a drinking straw cut 2 circles per topper.
apply to the center of the brown circles on the eyes.
Roll out some white fondant, with a cocktail straw cut out to dots per eye.

Layer the white dots on the black circles of the eyes.
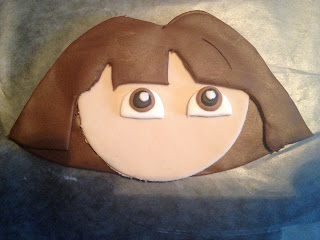
With the icing tip you cut the brown circles for her eyes, use the wide end to make an imprint for her mouth, with the smaller tip end make an imprint for her nose.

...and she's done!
I have watched so much Dora in the past 3 years I think I had every Dora song run through my head at least once while I was making these.
This was such a fun project.

The grab and go cupcake doesn't break their stride and saves the adults from cutting and serving cake ( and cleaning up the mess).
This weekend the party was for my friends twins.
I get such a kick out of them.
They were very vocal in their concerns that they would each have their own cupcakes. Her son picked Batman and her daughter picked Dora the Explorer.
Batman is an easy one. I have a set of bat cookie cutters that I use to cut out black bats and I put them on yellow ovals. Couldn't be easier.

Dora, that's a whole different adventure.
I had never made Dora before, but she looked like she was going to be a little easier than others I have done.
When I don't have a cutter I make a template from an image online.
I found a Dora face image and sized it to fit on the cupcake.
I printed it out on computer paper and cut the face out around the outer lines.

Roll out some brown fondant and gumpaste mix to 1/4 inch thickness. Lay a piece of waxed paper over the top, place your cut out image on top of the wax paper and cut around the template with an Exacto knife.
Roll out some beige fondant/ gumpaste mix , cut a circle with a 2 inch round cutter.

Lay the beige circle on the brown cut out piece.

Cut the template along Dora's hairline.

Roll out more of the brown and cover with wax paper, place hair template on the top and cut out with an Exacto knife.

Layer the top hair piece over the beige face circle.
Roll out white fondant and with 1/2 inch round cutter cut 2 circles per topper.

Trim one edge of the circles flat.

Add to Dora's face for her eyes.

Next roll out some more brown. With a round icing tip cut out 2 circles per topper.
center on whites of eyes.


Roll out some black fondant, with a drinking straw cut 2 circles per topper.
apply to the center of the brown circles on the eyes.
Roll out some white fondant, with a cocktail straw cut out to dots per eye.

Layer the white dots on the black circles of the eyes.

With the icing tip you cut the brown circles for her eyes, use the wide end to make an imprint for her mouth, with the smaller tip end make an imprint for her nose.

I have watched so much Dora in the past 3 years I think I had every Dora song run through my head at least once while I was making these.
This was such a fun project.

No comments:
Post a Comment
Note: Only a member of this blog may post a comment.