I am probably jinxing myself , but I can't help but think how easy my next cake is going to be.
I received an e-mail from a friend needing a Pokemon cake for her son's 8th birthday. She attached a picture. All he wants is the "ball" . Simple, round, 1/2 red, 1/2 white with a black band.
Other than the fact that I know absolutely nothing about Pokemon, I'm looking forward to making this cake. The birthday boy has just started chemo again and is battling a brain tumor, you would never know it though. He is as active, vibrant, and as happy as any 8 year old boy I've ever met, if not even more so.
This cake HAS to be special!
It did seem very boring to just deliver a red, white and black ball, so I decided I'd throw in a few Pokemon character cupcakes.
Now I'm in over my head. Who are Pokemon's friends? I had to google it but I found a few pictures of some Pokemon cupcakes. I sorted through all the characters and these what I came up with.
When I do cupcakes I like to make the design on a fondant disc that I set on top of a fluffy swirl of buttercream.
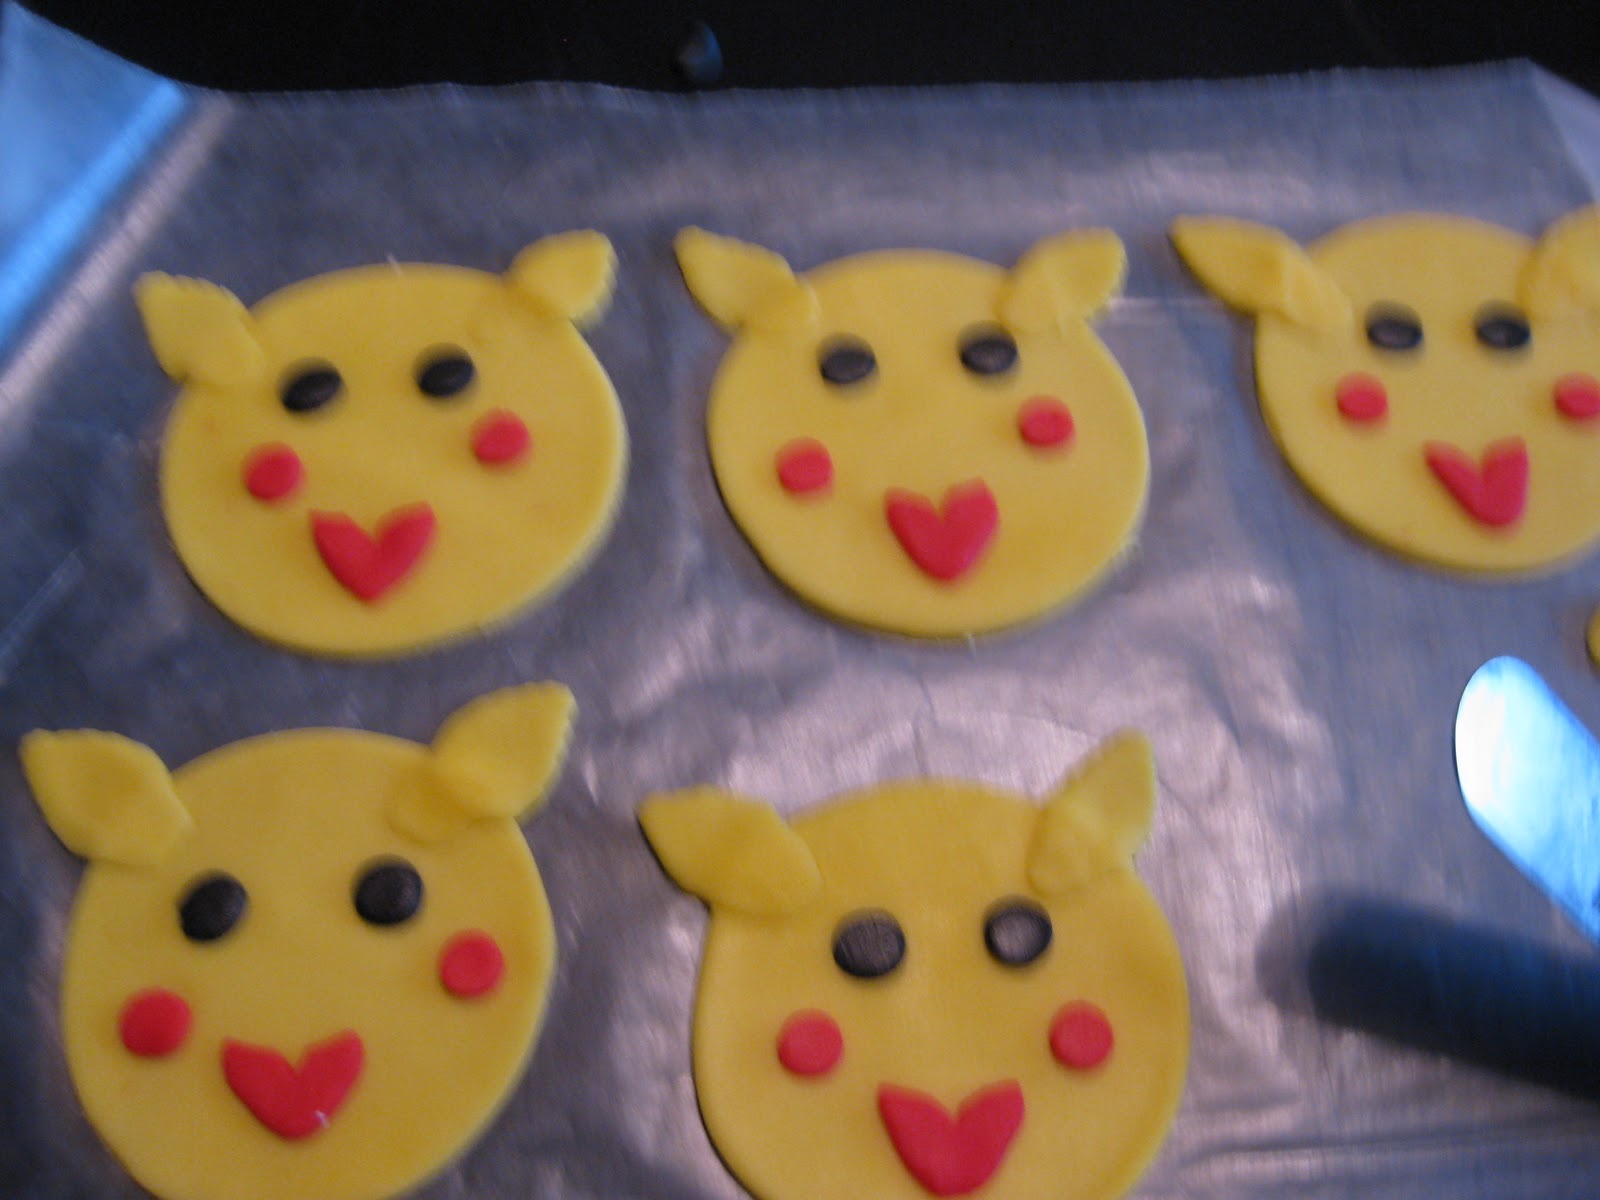
I cut some disc's out of yellow fondant with one of my biscuit cutters ( 2 inch )

For the ears I used my Wilton leaf cutter. ( only because I couldn't find anything else. You will have to rub down the ridges on the edge.) Ideally I would have liked a straight edged leaf cutter.

I pinch one end and smooth the edges of the other. Apply it by rubbing and smoothing to the yellow disc.


For the face I used red, black and white fondant.
To cut the circles I used Wilton tips 5 & 12 and a 1/2 inch round cutter.
For the mouth I cut a bunch of red circles with my 1/2 inch round cutter ( you won't use this many, I just allow myself room for error ) .

I cut out a bit of the top with the cutter.

I cut a "V" in the top with my Exacto knife and pinched the corners a bit.

Next I did the cheeks. I cut another bunch of circles with my Wilton #12 tip.

Stick them on the face.

I rolled out a little black fondant , and again with my # 12 tip I cut circles for the eyes.
 Stick those on the face.

With my #5 tip, I cut a bunch of white dots.

Stick them on the black fondant eyes.
For the nose I just bent little scraps of the black.

Next I did Piplup. ( showing off my newfound Pokemon vocabulary )
I picked this one because I like him and blue birds are supposed to be good luck. ( I'm assuming he is supposed to be a bird...)
I started with white fondant discs. Cut with my 2 inch biscuit cutter.
Next I rolled out some blue fondant and cut discs out of that with the same 2 inch biscuit cutter.
I used a 1 inch round cutter to take 2 semi-circle chunks out of the bottom.

Next use an Exacto knife and cut out a V shaped wedge between the 2 semi-circles.

I mixed some white fondant in with some of the blue for a lighter shade of blue and rolled them into strips.
I cut the long strips into 1 1/2 inch strips and used the 1/2 inch round cutter to cut out a semi circle.

I place the darker blue piece on top of the white disc, then I lift and place the lighter blue strip under that. My fondant was drying so I smoothed out the wrinkles with a little vegetable shortening at the end.

To make his beak I rolled out some yellow fondant and cut out a bunch of circles with my 1/2 inch circle cutter .

I stretch this into an elongated tear drop.
 Fold the top over.

Attach the beak with some gum glue to cover the semi-circle cut out and press and smooth a bit.

Cut some black circles with the #12 tip , place on face and smooth into ovals .

Last step.
Cut out some more white dots with your #5 tip and place them on the black fondant eyes.

Done , a bunch of blue birds to hopefully bring this little boy some luck !

I made 2 other characters as you see in the photo. Anyone wanting a tutorial on those please message me and I'll be glad to make one.

I received an e-mail from a friend needing a Pokemon cake for her son's 8th birthday. She attached a picture. All he wants is the "ball" . Simple, round, 1/2 red, 1/2 white with a black band.
Other than the fact that I know absolutely nothing about Pokemon, I'm looking forward to making this cake. The birthday boy has just started chemo again and is battling a brain tumor, you would never know it though. He is as active, vibrant, and as happy as any 8 year old boy I've ever met, if not even more so.
This cake HAS to be special!
It did seem very boring to just deliver a red, white and black ball, so I decided I'd throw in a few Pokemon character cupcakes.
Now I'm in over my head. Who are Pokemon's friends? I had to google it but I found a few pictures of some Pokemon cupcakes. I sorted through all the characters and these what I came up with.
When I do cupcakes I like to make the design on a fondant disc that I set on top of a fluffy swirl of buttercream.
Pikachu
( I've at least heard of him/her/it)
I cut some disc's out of yellow fondant with one of my biscuit cutters ( 2 inch )

For the ears I used my Wilton leaf cutter. ( only because I couldn't find anything else. You will have to rub down the ridges on the edge.) Ideally I would have liked a straight edged leaf cutter.

I pinch one end and smooth the edges of the other. Apply it by rubbing and smoothing to the yellow disc.


For the face I used red, black and white fondant.
To cut the circles I used Wilton tips 5 & 12 and a 1/2 inch round cutter.
For the mouth I cut a bunch of red circles with my 1/2 inch round cutter ( you won't use this many, I just allow myself room for error ) .

I cut out a bit of the top with the cutter.

I cut a "V" in the top with my Exacto knife and pinched the corners a bit.

Next I did the cheeks. I cut another bunch of circles with my Wilton #12 tip.

Stick them on the face.

I rolled out a little black fondant , and again with my # 12 tip I cut circles for the eyes.

With my #5 tip, I cut a bunch of white dots.

Stick them on the black fondant eyes.
For the nose I just bent little scraps of the black.

Next I did Piplup. ( showing off my newfound Pokemon vocabulary )
I picked this one because I like him and blue birds are supposed to be good luck. ( I'm assuming he is supposed to be a bird...)
Piplup
I started with white fondant discs. Cut with my 2 inch biscuit cutter.
Next I rolled out some blue fondant and cut discs out of that with the same 2 inch biscuit cutter.
I used a 1 inch round cutter to take 2 semi-circle chunks out of the bottom.

Next use an Exacto knife and cut out a V shaped wedge between the 2 semi-circles.

I mixed some white fondant in with some of the blue for a lighter shade of blue and rolled them into strips.
I cut the long strips into 1 1/2 inch strips and used the 1/2 inch round cutter to cut out a semi circle.

I place the darker blue piece on top of the white disc, then I lift and place the lighter blue strip under that. My fondant was drying so I smoothed out the wrinkles with a little vegetable shortening at the end.

To make his beak I rolled out some yellow fondant and cut out a bunch of circles with my 1/2 inch circle cutter .

I stretch this into an elongated tear drop.


Attach the beak with some gum glue to cover the semi-circle cut out and press and smooth a bit.

Cut some black circles with the #12 tip , place on face and smooth into ovals .

Last step.
Cut out some more white dots with your #5 tip and place them on the black fondant eyes.

Done , a bunch of blue birds to hopefully bring this little boy some luck !

I made 2 other characters as you see in the photo. Anyone wanting a tutorial on those please message me and I'll be glad to make one.

No comments:
Post a Comment
Note: Only a member of this blog may post a comment.